
Clothing for Crutch Users: Practical, Stylish Recovery Wear

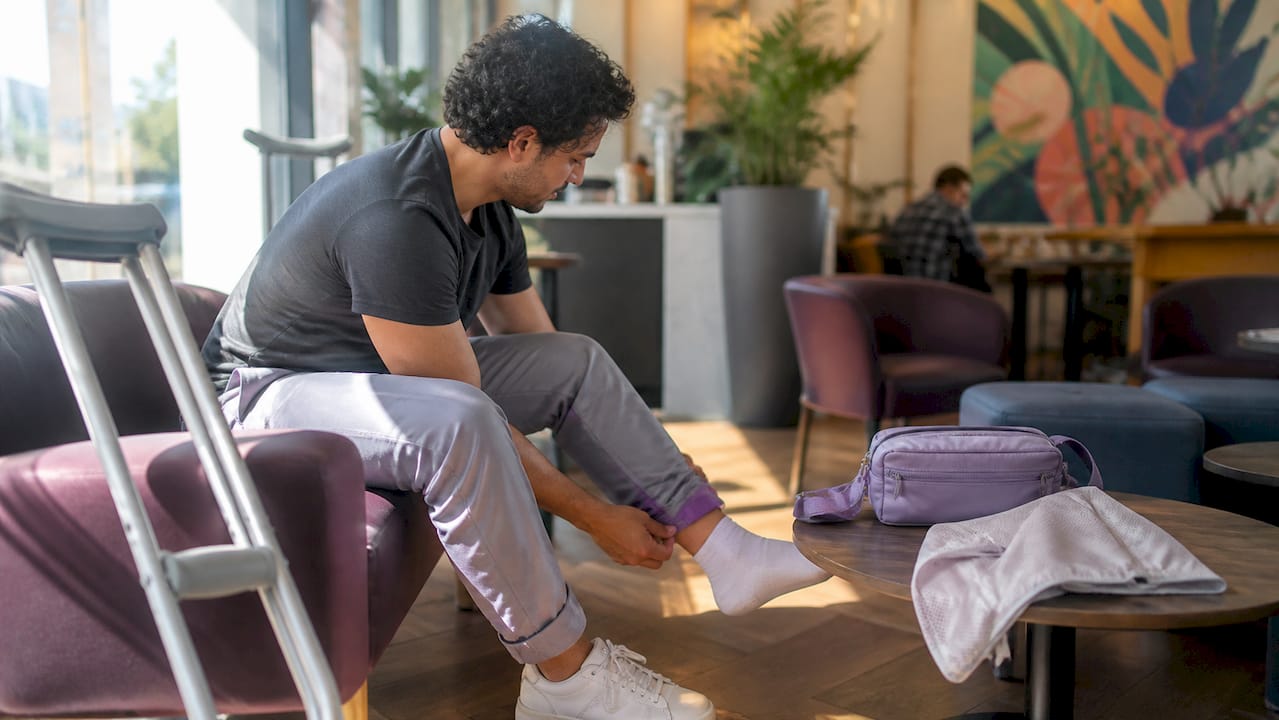
Choose fitted, easy-on/off pieces with cropped hems, non-slip shoes, and a hands-free bag — that combination keeps you safer, makes dressing less of a battle, and lets you feel like yourself again during recovery.
Here’s why those choices matter: long hems catch on crutch tips and create a real trip hazard, bulky bags throw off your balance, and lace-up shoes become a two-handed project you simply don’t have hands for. Swapping just three things makes an immediate difference:
Swap a tote bag for a crossbody or belt bag so both hands stay on your crutches.
Swap long hems for cuffed or cropped pants that clear your ankle by a safe margin.
Swap lace-up shoes for slip-ons, zip closures, or hook-and-loop straps.
Pro Tip: Before you leave the house in a new outfit, do a slow crutch-walk across your living room. If any fabric drags, catches, or shifts your balance, fix it at home — not on a sidewalk.
Key Takeaways
The single most protective thing you can do is control your hem length, your footwear, and your bag before you leave the house — everything else builds from those three choices.
Point | Details |
Control your hems | Cuff or tailor pants to sit 1 inch above the ankle to prevent catching on crutch tips. |
Choose non-slip shoes | Wear closed-toe shoes with a heel under 1 inch and a rubber non-slip sole. |
Go hands-free | Use a crossbody bag, belt bag, or small backpack — never a tote or long shoulder strap. |
Prioritize adaptive features | Look for magnetic side zippers, elastic waists, and stretch fabrics for safer, easier dressing. |
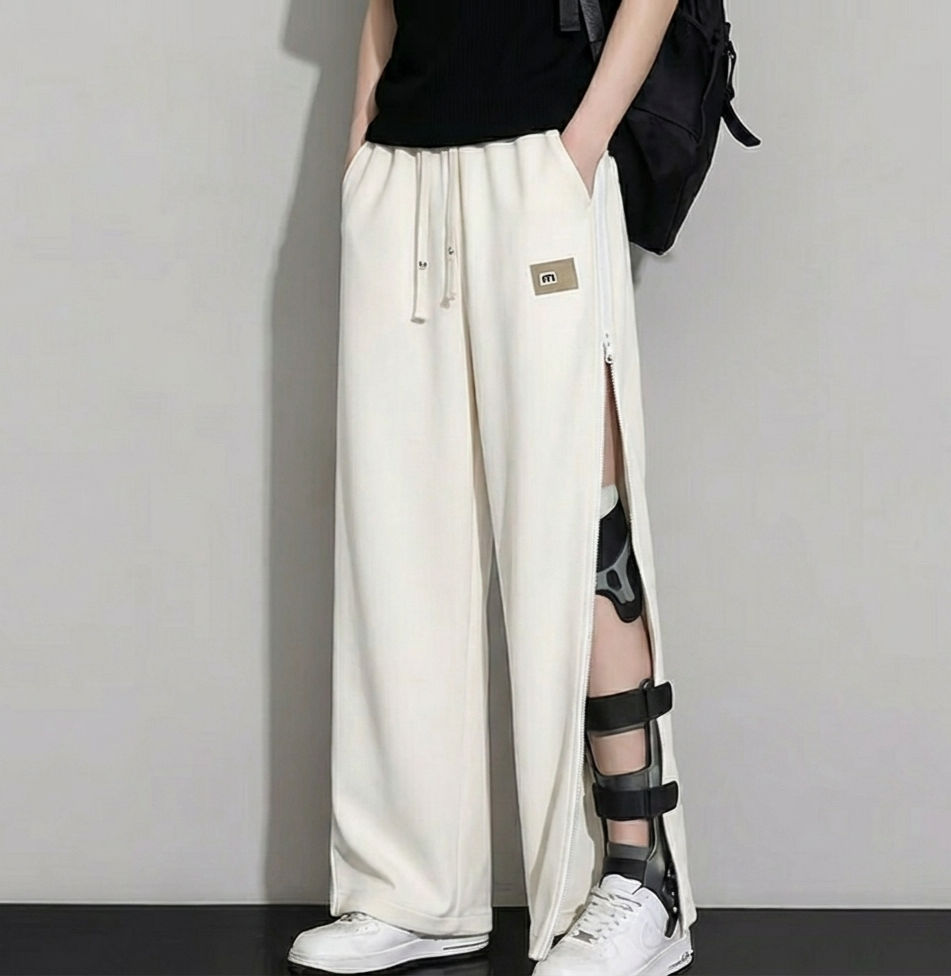
Fracture-club recovery pants | Side magnetic zipper pants designed to open around a cast, reducing risky movements at dressing time. |
A note from Fracture-club
Recovery is hard enough without your clothes making it harder. At Fracture-club, we design adaptive recovery wear because we believe you shouldn’t have to choose between feeling safe and feeling like yourself. Our easy-on/off pieces are built around the real frustrations of dressing with a cast or brace — the awkward angles, the one-handed mornings, the outfits that just don’t cooperate. We also give back: a portion of every purchase supports the Bone Health & Osteoporosis Foundation, because recovery is bigger than any one person. You’re not just buying clothes. You’re part of a community that gets it.
Table of Contents
What clothing rules should crutch users follow?
The right clothing for crutches users starts with one principle: nothing should compete with your crutches for control. That means every garment you put on should stay out of your way, stay on your body without adjustment, and let your arms move freely.
Hem length is the most urgent rule. Hems that brush the floor or catch on your crutch tips are a fall waiting to happen. Experienced crutch users recommend cuffed or cropped hems that sit clearly above the ankle.
[
](https://fracture-club.com/product-page/fracture-club-magnetic-shoulder-zip-tee-injury-recovery-wear)
Waistbands and closures matter more than you’d expect. Elastic waists and pull-on styles mean you can dress seated and without needing two free hands. Buttons, belts, and stiff zippers slow you down and add unnecessary frustration.
Fabric should have some stretch. Rigid denim or structured trousers restrict the hip and knee movement you need to swing your body forward on crutches. Knit fabrics, jersey, and stretch cotton all work well.
Key rules at a glance:
Hems: cropped, cuffed, or tailored to sit above the ankle.
Waists: elastic, drawstring, or magnetic closure only.
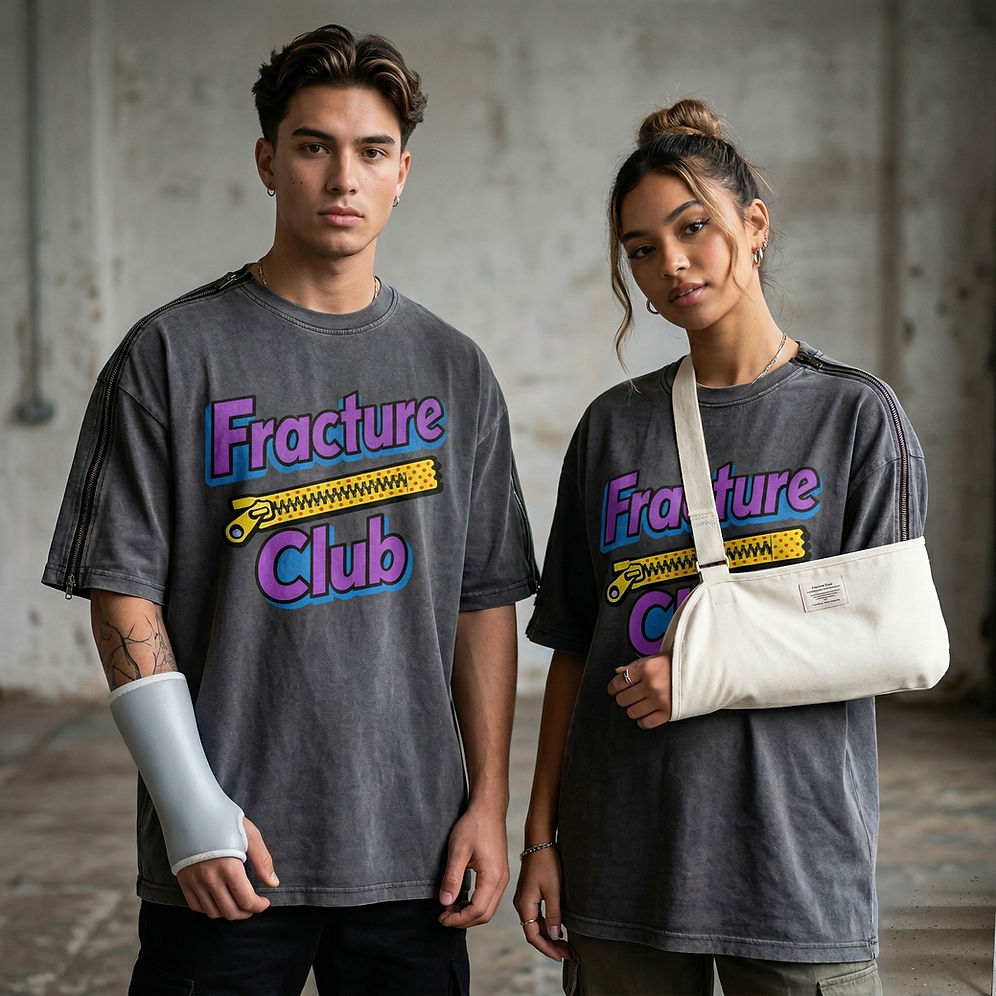
Sleeves: fitted or three-quarter length so fabric doesn’t bunch under the crutch pad.
Pockets: deep side or interior pockets reduce the urge to carry a bag.
Fabrics to prefer: jersey, stretch cotton, ponte, and soft knit.
Fabrics to avoid: stiff denim, structured wool, or anything that doesn’t give at the knee and hip.
Clinician guidance from MedlinePlus reinforces this: non-skid soles and clutter-free floors are part of the same safety picture as your clothing choices. What you wear and how your environment is set up work together.
How to choose tops and layers that work with crutches
The underarm area takes a beating on axillary crutches. Chafing from the crutch pad against bare or thin fabric is one of the most common complaints, and it’s almost entirely preventable with the right top.
Prioritize these features:
Hip-length or shorter tops so fabric doesn’t bunch under the crutch pad or ride up when your arms are raised.
Fitted or semi-fitted sleeves that stay in place rather than sliding toward your elbow mid-stride.
Front openings or wide necklines for days when shoulder or arm mobility is limited.
Soft, seam-free underarm panels in fabrics like modal or bamboo jersey to reduce skin irritation.
Layering for temperature control is smart, but keep it simple. A fitted base layer topped with an open zip-up or button-front cardigan gives you warmth you can remove one-handed. Avoid heavy overhead pullovers on days when your arms are tired from crutching.
Axillary crutches can cause underarm chafing. Wrapping the factory pads or wearing tops that add a protective layer over the underarm area significantly reduces skin irritation during extended use.
For upper-limb injuries or anyone who finds pulling a shirt over their head difficult, an easy-on/off sweatshirt designed for recovery is worth considering. It removes the overhead struggle entirely.
Pro Tip: A thin compression tank under your regular top adds a protective layer right where the crutch pad contacts your body. It’s a small addition that makes a big difference on longer outings.
Bottoms that keep you safe, comfortable, and easy to dress
Lower-body clothing is where most crutch users run into the most trouble, and where the right choice pays off most visibly.
Leggings and joggers are the workhorses of crutch recovery. High-waist leggings stay put without a belt, don’t restrict hip movement, and are easy to pull on while seated. Joggers with an elastic cuff at the ankle keep the hem controlled without any tailoring.
[
Straight or slim jeans can work if they have some stretch, but cuff them to sit above the ankle. Avoid wide-leg or flared cuts entirely — the extra fabric near the floor is exactly what catches on crutch tips.
Shorts are genuinely underrated for crutch users. They eliminate hem risk completely, allow easy access to a cast or brace, and keep you cool. Tailored shorts that hit just above the knee work for casual and semi-casual occasions.
Skirts and dresses are possible with the right approach. Knee-length dresses worn with bike shorts underneath are a reliable combination: the bike shorts handle modesty when the skirt swings, and the knee length keeps the hem well clear of crutch tips. Midi and maxi lengths are risky unless the hem is secured or tailored.
Easy-on/off pants strategies:
Elastic waists or drawstrings over any button or hook closure.
Side-zip or magnetic closures for pants that need to open around a cast or brace.
Test any new pair at home by sitting, standing, and doing a slow crutch-walk before wearing them out.
Pro Tip: Use iron-on hem tape to temporarily shorten a favorite pair of pants without cutting them. It takes five minutes and washes out later when you no longer need the adjustment.
What shoes are safest when you’re using crutches?
Your one weight-bearing foot carries everything, so the shoe on it matters more than almost any other clothing choice you’ll make.
Safe shoe criteria:
Closed toe to protect the foot from impact.
Heel under 1 inch to keep your center of gravity stable.
Non-slip rubber sole with real grip — smooth leather or thin fashion soles are not adequate.
Secure fastening via zip, hook-and-loop strap, or elastic gore so the shoe stays on without tying.
Snug fit with no heel slippage, which can throw off your balance mid-stride.
For socks, choose a cushioned sole and a snug fit around the heel. Compression socks can help with circulation if you’re spending long periods seated or partially weight-bearing. Avoid thick, bulky socks that make shoes feel tight and alter your foot’s position inside the shoe.
MedlinePlus crutch guidance specifically calls out non-skid shoes as a core safety requirement alongside correct crutch height. Backless shoes, flip-flops, and high heels are not compatible with safe crutch use — full stop.
How to carry your essentials hands-free on crutches
Both hands are on your crutches. That’s the rule, and it means every bag you own needs to be re-evaluated.
Crossbody bags are the most practical option for most outings. They sit across the torso, don’t swing into your legs, and distribute weight evenly. Keep the strap short enough that the bag rests at hip level, not swinging at thigh level where it can hit your crutch.
Belt bags (fanny packs) are even more stable because they sit against your body and don’t move at all. They hold a phone, keys, cards, and a small water bottle — enough for most trips.
Small backpacks work well for longer outings or when you need to carry more. The weight distributes across both shoulders, which actually helps with balance. The trade-off is that you can’t access them without stopping and setting your crutches somewhere safe.
Hands-free bags are a practical necessity, not a style preference. Tote bags and long shoulder straps that slide down your arm can pull you off balance at exactly the wrong moment.
Avoid: tote bags, long shoulder straps, wrist bags, or anything that requires a hand to hold.
Use deep jacket pockets or interior vest pockets for very short trips where a bag feels like too much.
Pro Tip: Thread a carabiner clip through your crossbody strap and clip it to a belt loop. It stops the bag from swinging forward when you lean on your crutches and keeps it exactly where you put it.
Adaptive clothing features that genuinely help during recovery
Adaptive clothing for mobility isn’t a niche category anymore. Magnetic closures, side zips, and easy-open designs are now available in everyday styles, and they solve real problems for anyone dressing with a cast, brace, or limited hand strength.
Features worth prioritizing:
Side magnetic zippers that open the full length of a pant leg, allowing you to dress around a cast without removing it.
Front-opening tops with magnetic snaps instead of buttons.
Elasticated waists with a wide, soft waistband that doesn’t dig in when seated for long periods.
Stretch fabrics with at least 4-way stretch so the garment moves with you rather than pulling.
Interior security pockets so your phone doesn’t fall out when you lean forward on your crutches.
Each of these features reduces the number of movements required to get dressed. Fewer movements means less time balancing on one leg, less risk of a stumble, and more energy saved for the rest of your day.
Adaptive recovery wear with magnetic and zipped closures directly addresses dressing independence. It’s a practical alternative to oversized sweats and supports self-reliance during recovery — which matters as much for your mindset as it does for your safety.
Fracture-club’s easy-on/off adaptive recovery pants use side magnetic zippers specifically designed to open around a cast or brace, cutting down on the risky balancing act of pulling pants over an injured leg. For more on dressing with a leg cast, Fracture-club’s guides walk through the full process.
Pro Tip: When shopping for adaptive pants, open and close the magnetic zipper with one hand before buying. If it requires two hands to align, it won’t help much on a difficult morning.
Always check with your clinician about specific mobility restrictions before changing your dressing routine. Individual recovery needs vary, and your physical therapist can flag any movements that should be avoided.
How to get dressed safely while using crutches
Getting dressed is one of the riskiest moments of a crutch user’s day because it requires balance, bending, and often one-handed maneuvering. A consistent sequence makes it much safer.
Seated dressing sequence:
Sit in a stable chair with armrests before you start.
Put socks and shoes on the uninjured foot first while seated.
Pull pants over the injured leg first, then the uninjured leg — this keeps the injured limb in a controlled position.
Stand only when both legs are dressed and your crutches are within reach.
Fasten any closures while standing with one crutch under your arm for support, or return to the chair.
For stairs, always lead with the uninjured leg going up and the injured leg going down. The phrase “good goes up, bad goes down” is a standard physical therapy reminder. Keep one hand on the rail when possible, which may mean carrying your crutch under your arm on that side.
Before moving through any space, do a quick visual check: loose rugs, wet floors, cords, and low furniture are the most common hazards. Keeping floors clear of clutter is part of the same safety framework as correct crutch height and non-skid soles.
A bedside caddy for your phone, medication, and charger cuts down on unnecessary trips across the room, reducing fall risk before you’re even fully awake.
Pro Tip: Keep a second pair of slip-on shoes next to your bed. Putting shoes on first thing — before you stand — gives your weight-bearing foot proper support from the moment you’re upright.
When to ask for help and red flags to watch for
Recovery is not a solo sport, even when you want it to be. Knowing when to ask for help is part of staying safe.
Red flags that mean stop and rest:
Lightheadedness or dizziness while standing or crutching.
Repeated near-falls or a feeling that your crutches are slipping.
Persistent pain in your wrists, shoulders, or underarms from crutch use.
Swelling or color change in the injured limb that wasn’t there before.
Situations where a caregiver or therapist should assist:
Dressing in a confined space like a small bathroom.
Navigating stairs for the first time after injury.
Getting in and out of a car, especially a low vehicle.
Any dressing task that requires you to balance on one leg for more than a few seconds.
If you’re finding dressing after injury consistently difficult or painful, that’s worth raising with your physical therapist. Occupational therapists specialize in exactly this — adaptive dressing strategies, assistive tools like button hooks and zipper pulls, and home modifications that reduce risk.
This article is general information, not a substitute for professional medical advice. Always follow your clinician’s specific guidance for your injury, and consult a physical or occupational therapist for personalized dressing and mobility support.
Recovery wear that actually fits your life
[
](fracture-club.com)
Fracture-club’s adaptive recovery pants with side magnetic zippers solve the specific problem this article keeps coming back to: getting dressed around a cast or brace without a dangerous balancing act. The magnetic side zippers open the full length of the pant leg, so you stay seated and in control the whole time. Pair them with the easy-on/off sweatshirt for a complete outfit that requires no overhead pulling and no fumbling with buttons. Both pieces are designed for real recovery days, not just the good ones. Browse the full range at Fracture-club and find what fits your recovery.
Sources
Recommended
Comments