
Stay Independent After Surgery: Bathroom Clothing With Side Zips

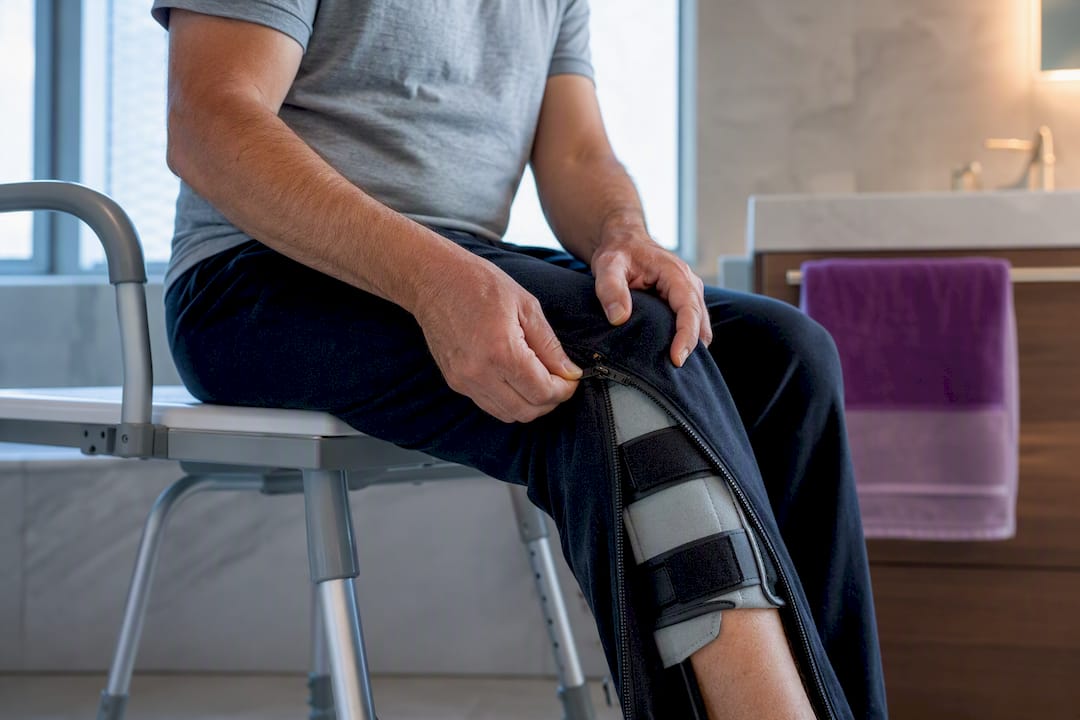
The right bathroom clothing after surgery means easy-on/off pants and tops with side zips, magnetic closures, or elastic waists that let you toilet and dress without bending, twisting, or wrestling fabric over a cast. Look for side-access pants with mid-thigh reach and front-opening tops that skip overhead dressing entirely. Fracture Club’s adaptive pants and sweatshirt are built around exactly this problem and are ready to order.
TL;DR:
Fully opening side zippers that run from waistband to hem are essential for easy toilet transfers and caregiver assistance.
Magnetic closures, Velcro, and elastic waistbands enable one-handed dressing and accommodate swelling or size fluctuations.
Pre-adjusting clothing to mid-thigh and dressing injured limbs first reduce the risk of falls and unnecessary fabric manipulation.
Properly sized adaptive clothing should be measured over the cast with added inches for mobility, using adjustable fasteners for comfort.
Selecting quick-dry, machine-washable fabrics and rotating multiple outfits help maintain hygiene and comfort during recovery.
Table of Contents
How Do You Get Dressed and Use the Bathroom Safely With a Cast?
How Can Caregivers Help Without Making It Harder on Themselves?
How Do You Stay Clean and Fresh While Wearing Adaptive Clothing?
What Types of Adaptive Clothing Are Built Specifically for Bathroom Access?
How Do You Pick Clothing for Different Injuries and Mobility Levels?
What Materials and Fasteners Actually Hold Up During Recovery?
Your Bathroom-Ready Checklist Before Any Transfer
You don’t need to overthink every bathroom trip. You just need the right setup, once, so it works every time. A few minutes of preparation before you even head toward the toilet saves you from the worst part of recovery: getting stuck halfway through undressing with nowhere to go.
Run through this before you attempt a transfer, especially in the first few weeks with a new cast or brace:
Pre-adjust your clothing by pulling pants down to mid-thigh before you get close to the toilet, not after.
Wear side-zip pants or elastic waistbands, plus a front-opening top, so nothing needs to go over your head or hips.
Keep a waterproof cast cover, wipes, a hand towel, and a grab bar or bedside commode within arm’s reach.
Slip-on shoes and a cleared floor path cut your fall risk more than almost anything else on this list.
None of this is complicated. It’s just easy to forget when you’re exhausted, sore, and trying to get through a task that used to take ten seconds.
Which Clothing Features Actually Make Bathroom Use Easier?
Not every “adaptive” label means the same thing. Some garments just have a looser cut. The features that genuinely change your bathroom experience are more specific than that, and they come down to how the garment opens, how it stretches, and how it fits once you’re seated.
Side zippers that open fully matter more than almost any other feature on this list. A zipper that runs from waistband to hem lets you open one leg completely for a toilet transfer or hoist use, instead of pulling fabric down over a rigid cast. Side-zip trousers designed for transfers also make caregiver-assisted changes far less awkward, since there’s no rotating or lifting required.
Magnetic closures and Velcro handle the one-handed problem that buttons and traditional zippers create. If you’ve got a broken wrist or a sling, magnetic closures, Velcro, and side zips let you dress and use the bathroom with one working hand, which is a bigger deal than it sounds until you’ve tried buttoning a shirt with your non-dominant hand.
Elastic waistbands, drawstrings, and stretch fabrics absorb swelling, which almost everyone underestimates. Your leg or arm won’t stay the same size all week.
Seated-fit design (extra room through the hip and seat) prevents fabric from bunching when you sit.
Machine-washable, quick-dry fabric matters more once you’re doing laundry more often than usual.
Pro Tip: Buy one size up in the waist if you’re between sizes. A slightly loose waistband with a good drawstring beats a snug one you can’t adjust one-handed.
How Do You Get Dressed and Use the Bathroom Safely With a Cast?
Getting through a bathroom trip with a cast or brace is a sequence, not a single motion. Rush it, and you risk soaking the cast, losing your balance, or soiling clothing you can’t quickly remove. Follow this order and it gets easier fast.
Pre-adjust before you move. Pull your pants down to mid-thigh while you’re still steady, before you approach the toilet. Trying to do this at the last second is how falls happen.
Dress injured-limb-first, undress injured-limb-last. When putting clothes on, the injured arm or leg goes into the garment first; when taking clothes off, it comes out last. This single rule prevents most of the awkward stretching that causes pain or tears fabric.
Sit down deliberately. Use a grab bar if you have one installed, and practice the sit-down motion slowly the first few times. Practicing transfers and keeping the cast dry matters more than speed.
Use your side zip. If you’re wearing adaptive pants, open the zipper fully on the injured side rather than trying to pull the waistband down over the cast.
Know when to call for help. If you feel unsteady, if the bathroom floor is wet, or if you can’t complete the sequence without pain, pause and ask a caregiver. Falls and soiled clothing both cost you more time and dignity than asking for a hand ever will.
How Can Caregivers Help Without Making It Harder on Themselves?
Helping someone dress and transfer safely is physical work, and doing it wrong wears out your back fast. A little setup changes everything.
Prepare supplies before you start, not mid-transfer: cast cover, towel, clean clothes, and any mobility aids should already be within reach. Use a gait belt and pivot steps instead of lifting, and open side zips completely before you begin so you’re not fighting fabric around a rigid cast. When removing clothing, work from the uninjured limb first, and save the injured limb for last, the same rule that applies when the patient dresses independently.
Explain each step out loud before you do it. It reduces anxiety and prevents surprised, sudden movements.
Use a towel or modesty cover during transfers to preserve dignity, especially in shared living situations.
Keep the cast dry at all times, and spot-clean or change clothing promptly if there’s any soiling risk.
Pro Tip: If you’re assisting daily, learn the side-zip release before the first transfer, not during it. Fumbling with an unfamiliar closure under pressure is where most caregiver strain happens.
How Do You Size Adaptive Clothing to Fit Over a Cast?
Sizing for a cast or brace is different from ordinary clothes shopping, and getting it wrong means returning items or living with something uncomfortable for weeks.
Measure directly over the cast or brace, then add one to two inches at any point where you still need range of motion, like the knee or elbow. Prioritize garments with adjustable fasteners such as drawstrings, Velcro tabs, or magnetic snaps over fixed sizing, since your swelling will change day to day.
Seated-fit pants with a slightly longer inseam accommodate leg casts better than standard cuts.
Wide armholes and a front-opening design work best for shoulder, arm, or wrist injuries.
Check the return policy and fabric care instructions before you buy, since you may need to size up or down once the garment arrives.
One-handed fastener types (magnets or Velcro) beat traditional buttons and hooks every time you’re managing a sling or a cast.
This is exactly the gap Fracture Club’s easy-on/off adaptive recovery pants and sweatshirt were built to close. The pants use side magnetic zippers that run the full leg length, so you get toilet-ready access without fighting a cast, and the sweatshirt opens from the front for shoulder and arm injuries. If you want a deeper walkthrough on measuring, how to size clothes over a cast covers it step by step.
How Do You Stay Clean and Fresh While Wearing Adaptive Clothing?
Hygiene gets harder with a cast, not easier, because you can’t just throw everything in the shower or change as often as usual. The fix isn’t complicated, but it does take a bit of planning.
Choose fabric that’s genuinely quick-dry and machine washable, since you’ll likely be doing laundry more frequently while your mobility is limited. Cotton blends with a little stretch hold up better than pure cotton, which stays damp longer and can irritate skin near a cast edge.
Change clothing at the first sign of dampness near the cast, not after it’s already soaked through. A wet cast is a real problem, not just an inconvenience. If you can’t change immediately, a waterproof cast cover during bathroom trips buys you time and protects the cast material itself.
Spot-clean garments between full washes when a full change isn’t practical. Side-zip pants make this easier because you can access the area you need without removing the entire garment. Keep a small stash of wipes near the toilet for quick cleanup, especially if you’re managing one-handed.
Rotate between at least two or three adaptive outfits so nothing sits in the laundry hamper while you’re left without a comfortable option. This matters more than people expect in the first two weeks, when swelling changes daily and you’re not yet sure which fit works best. Buying one pair of adaptive pants and one top rarely lasts through a full recovery cycle comfortably.
Can You Modify Your Own Clothes Instead of Buying New Ones?
Sometimes you need a bathroom-friendly fix today, before a new order arrives. Modifying existing clothing is a reasonable stopgap, though it has real limits.
Cutting a side seam and sewing in Velcro strips can turn a regular pair of sweatpants into a side-access garment, at least temporarily. Replacing a button fly with a magnetic strip or a longer zipper pull also helps if you’re managing a hand or wrist injury and can’t grip small fasteners.
Swap drawstrings for wider, easier-to-grip cord, or add an elastic panel to a waistband that’s too tight over a cast. Iron-on hook-and-loop tape works in a pinch for tops that need a front opening instead of a pullover design.
The tradeoff is durability. Home modifications tend to fray at the cut seams, and DIY magnetic closures rarely hold as securely as garments engineered for it from the start. If you’re recovering for more than a few weeks, a modified pair of sweatpants is a bridge, not a long-term solution. Purpose-built adaptive pieces hold their closures through dozens of washes and don’t loosen the way a hand-sewn seam eventually will.
What Types of Adaptive Clothing Are Built Specifically for Bathroom Access?
A few garment styles exist specifically to solve the toileting problem, and it helps to know what they look like before you shop.
Side-zip pants are the most versatile option, opening fully along one or both legs so you never have to pull fabric over a rigid cast or brace. Open-back pants, which use a flap or panel instead of a full seam, work well for anyone using a wheelchair or hoist regularly, since they eliminate the need to stand and pull pants down at all. A garment structure using a removable rear panel and front-first fastening allows restroom access without removing the whole garment, a design idea aimed directly at this problem.
[
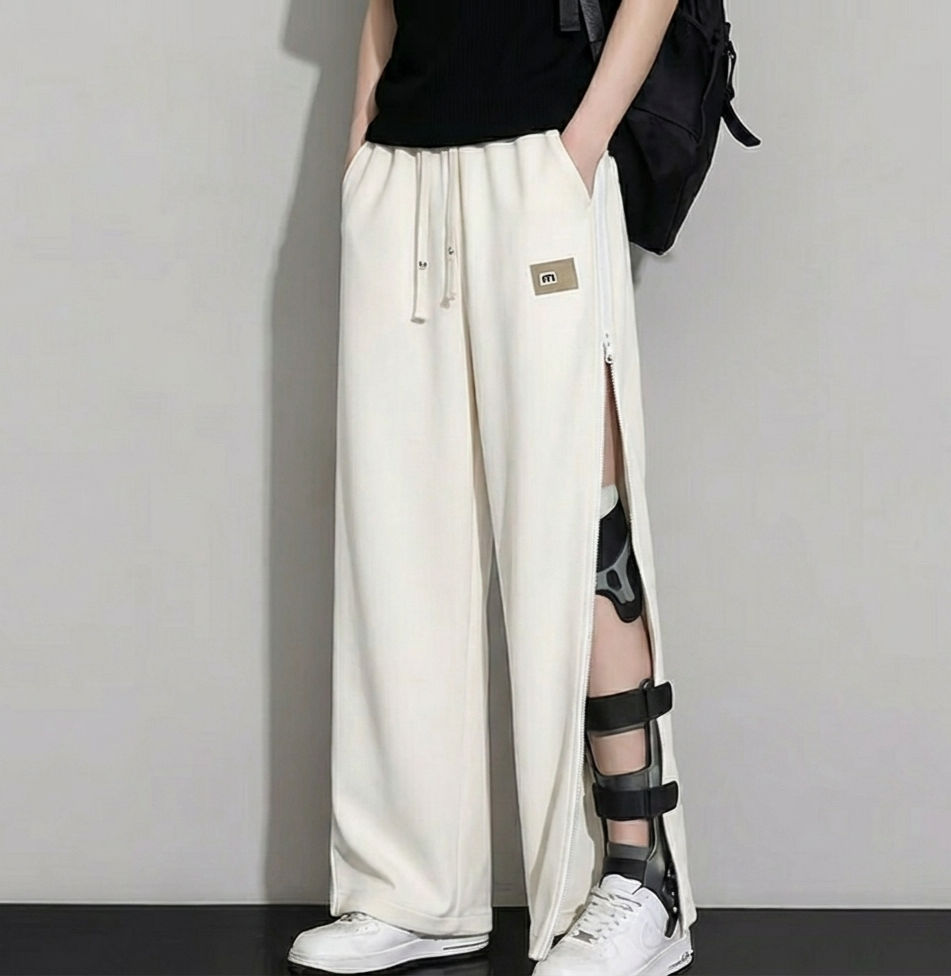
Split-seat trousers, less common but useful for extended hospital or bedbound recovery, use a center-back opening that separates for toileting without full undressing. Elastic-waist joggers with a wide, drawstring closure work for lighter injuries where you don’t need a full side zip but still want to avoid buttons and zippers you can’t manage one-handed.
Front-opening tops round out the picture for upper-body injuries: magnetic or snap closures down the front mean you never lift your arms overhead, which matters just as much in the bathroom as it does getting dressed each morning.
How Do You Pick Clothing for Different Injuries and Mobility Levels?
The right garment depends heavily on where your injury is and how much you can move on your own, so a one-size-fits-all answer doesn’t really exist here.
For leg or hip fractures, prioritize side-zip pants with a seated-fit cut, since you’ll spend more time sitting than standing during early recovery. For arm, wrist, or shoulder injuries, a front-opening top with magnetic closures matters more than anything happening below the waist. If you’re using a wheelchair or hoist for transfers, side zips that open fully reduce the rotating and lifting that a caregiver would otherwise need to do.
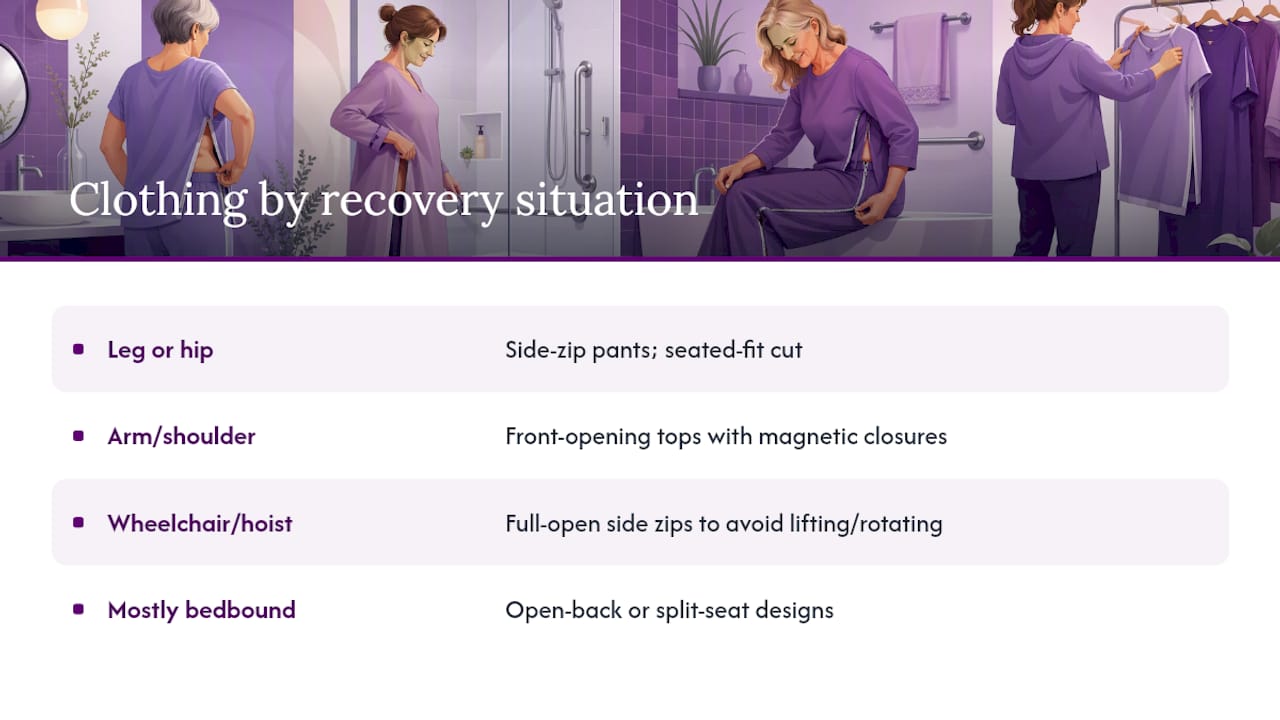
If your mobility is fairly limited and you’re mostly bedbound, an open-back or split-seat design will serve you better than a standard side zip, since it avoids full removal for every bathroom trip. If you’re mobile with a brace but still can’t bend well, a slightly higher elastic waist with a drawstring often beats a rigid zip closure, since you don’t need full-leg access, just easier reach. When in doubt, pants designed around leg cast movement are a safer starting point than guessing your way through a standard retail size chart.
What Materials and Fasteners Actually Hold Up During Recovery?
Fabric choice affects comfort, but fastener choice affects whether the garment works at all when you’re managing a cast one-handed.
Stretch fabrics, cotton-spandex blends especially, give recovery clothing the flexible structure needed to accommodate swelling without cutting off circulation. Rigid fabrics like denim or stiff canvas are the worst choice for anyone in a cast, since they don’t give at all as your limb changes size through the day.
Velcro remains the most forgiving fastener for shaky or weak grip, since it doesn’t require fine motor control to open or close. Magnetic closures go a step further, especially for people managing a sling or a single working hand, since magnets let you dress and fasten clothing without needing two hands to align anything. Traditional zippers and buttons should generally be avoided for the first several weeks unless you have full use of both hands.
Elastic drawstrings deserve a mention too. They’re simple, but a wide, easy-grip cord beats a thin nylon string every time you’re trying to tighten a waistband with limited dexterity. Whatever combination you choose, prioritize fasteners you can operate under stress, tired, in a hurry, or with one hand, since that’s the condition you’ll actually be in most days.
Regaining Independence, One Bathroom Trip at a Time
The hardest part of recovery isn’t the pain. It’s the small losses of independence, like needing help every time you use the bathroom. Getting dressed with the right pieces, side zips that open fully, magnets that don’t fight your grip, gave me back a piece of my day that used to feel impossible. That shift matters more than people expect until they’ve lived it.
Fracture Club exists because of that gap. Beyond the clothing, it’s a community of people who’ve been through the same setbacks, and a portion of every purchase supports the Bone Health & Osteoporosis Foundation. Try one adaptive piece. See how much of your day it gives back.
— Fracture
Ready to Try Adaptive Clothing That Fits Your Recovery?
You’ve read the checklist: side zips, magnetic closures, elastic waists, front-opening tops. Fracture Club built two pieces around exactly that list, and they’re ready to ship now, not weeks from now while you wait on a custom order.
[
](fracture-club.com)
The Unisex Easy-On/Off Adaptive Recovery Pants use full-length side magnetic zippers, so you can open one leg completely for a toilet transfer without pulling anything over your cast. Pair them with the Unisex Easy-On/Off Sweatshirt, built for shoulder, arm, and wrist injuries with a front-access closure so you never lift your arms overhead. Both match every feature in the sizing guide above: stretch fabric for swelling, one-handed fasteners, and a seated-fit cut that actually works from a wheelchair or bedside.
Not sure which size or feature fits your specific injury? Reach out through the inquiry services page and get a straight answer before you order, not after.
Sources
Recommended
Comments